Showing posts with label DIY. Show all posts

Wednesday, January 14, 2015

When Life Hands You Lemons... Make All of These Things!


So I love eating lemons. I add them to everything!!! Lemon bars? Yes please! Lemon pound cake? Yaaaas! Lemonade? Hell to the yes! Well there a couple of other great things I use lemons for and I just wanted to share some other uses that I have with this fruit.


1. D.I.Y Lemon Scrub: Totes easy to make. All you need is-
    - Juice of one lemon
    - One Tsp of olive oil
    -  Five Tsp of sugar
    - One Tsp of honey

Mix together all ingredients in a jar until smooth. After washing your face and while skin is still damp, gently rub exfoliator into skin with fingers in a circular motion. Great for the lips too! (I dare you not to taste it!) Rinse well with warm water. Follow up with moisturizer of choice. Ask everyone within a reasonable distance to come feel the softness that is otherwise known as your face. This recipe makes enough for 3-4 separate uses.
As far as a cost breakdown goes, it’s cheaper than cheap. The entire recipe cost is around $1.25, depending on the price of your lemon. Each recipe is good for 3-4 uses, so that’s $0.31-$0.42 per use. I think this would make a super cute (and economical) friend gift. [1]

2. Hot Lemon Water: I've talked about all of the great benefits of starting off a day with drinking warm lemon water and I'll reiterate it now. Not only does it help cleanse your system, wake up your metabolism, and help with digestive problems lemon water aids in dental care and is super yummy. Just pour yourself a glass, warm up for two minutes and squeeze in half of a lemon into your mug. I can't praise this enough.

3. Blueberry Lemon Marble Cake: Umm who wants to eat cake for breakfast, lunch, and dinner? Ya, I know me too. Here's the easy peasy recipe. 
Cake Ingredients
  • 2 sticks (vegan) butter, room temperature
  • 2 Cups granulated sugar
  • 2 tsp grated lemon zest
  • 1½ tsp lemon extract
  • 7 egg whites
  • 3 Cups of all purpose gluten free flour
  • 4 tsp baking power
  • ¼ tsp salt
  • 1¼ Cups of soy milk milk
  • 1 13 oz. jar blueberry jam with lemon juice
Frosting
  • 1 C granulated sugar
  • ¼ C water
  • 2 eggs
  • 3 sticks ( 1½ Cups)  of vegan butter, room temperature
  • 2 Tbsp freshly squeezed lemon juice
  • 1 Tbsp grated lemon zest

Instructions
Cake
  1. Preheat oven to 350 degrees.
  2. Grease and flour 3 eight inch cake pans and line bottom with wax paper.
  3. Cream together butter, sugar, lemon zest and lemon extract until fluffy.
  4. Add in the egg whites gradually, a couple at a time. Beat well between additions and scrape down sides of bowl.
  5. Mix together in another bowl the flour, baking powder and salt.
  6. Alternating flour and milk, beat the dry ingredients and milk into the butter mixture. Beat on medium speed for one minute to eliminate any lumps.
  7. Set aside 1 cup of batter in a small bowl.
  8. Divide the remaining batter between the three cake pans, smooth top with spatula.
  9. Add 2½ Tbsp jam to the reserved batter and mix well.
  10. Drizzle by the teaspoon over the batter in the pans.
  11. Use a wooden skewer to swirl the blueberry mixture into the lemon batter without mixing it in.
  12. Bake for 25 minutes or until toothpick comes out clean and cake pulls away from the sides.s
  13. Let cool for 10-15 minutes and remove from pan onto a wire rack. Cool completely.
Frosting
  1. In a small pan combine the sugar and water. Bring to a boil over medium heat, stir to dissolve sugar.
  2. Continue boiling without stirring. Use a pastry brush and some water to wash down the sides of the pan to remove sugar on the sides of pan. Heat until syrup reaches the soft ball stage or 238 degrees. Immediately remove from heat.
  3. In a large mixer beat the eggs briefly on medium speed.
  4. Slowly add the hot syrup in a thin stream, pouring it down the sides of the bowl. Do not allow it to hit the beaters or may splash.
  5. After all the syrup has been added raise speed to medium high speed and beat until the mixture is fluffy and cooled to body temperature. About 15-20 minutes.
  6. Reduce speed to medium low and gradually add the softened butter 2 - 3 Tbsp at a time, beat well between additions.
  7. Add in lemon juice and zest.
  8. To assemble cake place one layer on cake stand and spread with half the blueberry jam. Place second layer on top and spread with the remaining blueberry jam. Add third layer and frost the cake on top and the sides with buttercream. Garnish with blueberries and lemon slices
  9. Serve and enjoy. [2]

Monday, December 15, 2014

A Very Crafty Holiday Party

This past weekend I hosted a holiday party where my girlfriends and I ate a lot of yummy finger foods, listened to Christmas music, and made snow globes! They are really easy to make! Below are some pictures from the party if you'd like to take a look. I hope you all are enjoying your holiday gatherings...you guys Christmas is 10 days away!!!!! 


The Evite. I really love Paperless Post!

The food spread

As my student's would say "where's the bev?" 

Girl talk. 

My Snow globe! We kept singing "let it glowwww let it glowwww" ...ya we're nerds I know #SwagSoHard

Showing off proudly our masterpieces!

....and post holiday party relaxation


Wednesday, February 26, 2014

D.I.Y Painted Tote Bags


How's everyone doing? Hasn't this winter felt so long and endless? Well to help cure my winter blues I've been doing a lot of painting and a lot of d.i.y. projects. One of my favorite for sure was the tote bags that I made. They came out so wonderful {if I do say so myself}. Below are the steps to help make these puppies. I hope it gets warmer soon but until then I'll just do some more painting


Materials Needed:

- 1 plain tote bag
- washi tape or duck tape
- 1 ruler
- Desired paint pens {I like these}
- 1 pencil


Steps:

1. Decide what you want the design on the bag to be, I went here for a lot of great d.i.y tote bag inspiration.


2. For the same stripe design as mine, mark where you'd like to paint on your first strip and place the tape above that line.


3. Then continue to leave a half of an inch of space between painted spaces.


4. Then paint in the spaces where the tape is not placed. I'd recommend to paint the space at least twice so the color really bleeds through the fabric. 


5. Set to dry for about 5 minutes and then remove the tape. You are done!! :)

+ Here's the other tote bag that I made.

Thursday, May 9, 2013

Spring Edit or the Lion the Witch and Wardrobe Part Deux

This past weekend I FINALLY, as Eminem puts it, cleaned out my closet. If you all remember this past fall I decided to find a tangible way to edit all of the dresses in my closet and that system really worked! Go me! Now I decided to move on to everything else. Okay so I have 3 drawers of tops, yes 3, full of t-shirts, blouses, fancy shirts, really fancy shirts, etc etc. Yes I know I have a problem and I'm actively trying to recover, anyway so to set up a good editing system I decided to take out all of my tops and put a piece of washi tape on all of the tags. Then in 6 months when I bring out all of my fall/winter clothes again I'll see what I actually did and didn't wear and I'll donate all of the unused clothing.

Also, as I went through my clothes I spent some time trying things on and I filled two bags full of clothes that just didn't fit me anymore. So I'd recommend to not forget to try things on that may not look quite your size anymore. Good luck peeps!

How do you organize or edit your wardrobe? 

Setting out all of my clothes
Trying on this dress to see if it still fits, after 7 years, it does!

These pants, not so much. :/

Marking all of my clothes with washi tape on the tags to show that I haven't worn it.


Also found my puppy dog costume piece, I should totally keep this right??
After marking all of my clothes, I separated my clothes into similar colors, it just helps to quickly pick a top.
Donating 2 big bags of clothes, finally letting go! #RecoveringClothesHoarder

Packed away all of my winter clothes.


 *Loving all of these cute washi tapes.

*Have some designer duds that don't work in your wardrobe anymore? This online consignment store makes it easy to sell your pieces.

*Goop's golden rules for editing your wardrobe. Great tips! 

Wednesday, April 24, 2013

Creating an Herb Garden


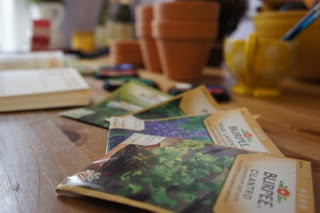
Last weekend I spent the afternoon gathering materials and putting together my herb garden. It was a very therapeutic 2 hours full of water color painting and packing soil. As I was putting together my garden it reminded me of the countless hours my parents would spend outside in our garden. Growing up at times it was difficult for me to appreciate this process because well what 12 year old wants to be outside in hot as hell SoCal weather pulling weeds or trimming plants with bugs flying around? However now looking back, I really miss those days. There were times I'd sit on the steps outside to watch my dad blare his music and garden up a storm. My dad and I had a really strained relationship for most of my young life but now looking back he communicated so many important lessons through those hours of verbal-less gardening: be patient, care for things as you'd want them to care for you, a good music playlist is always important, and sometimes you need to be silent to really listen to what's going on around you.

Well, let me just say that the prospect of seeing these little plants grow in 2-3 weeks is very exciting so please pray that I manage to care for them properly! I'll keep you updated!

*Herb Garden Guide:

-Materials Needed:

plant pots and saucers
desired seed packages
plant soil (preferably organic)
herb markers (here and here are some cute ones to purchase or just make your own out of paper like I did)
watercolors (to decorate the pots)
a designated area that isn't always directly in the sun
water

Steps: 

Paint pots as desired

Create plant labels out of small squares with the name of the herb.

Scoop soil into the pot and leave about 1 inch of space at the top

Create a little hole about 1/6th of the way down to place seeds in

Place seeds in, cover with soil, and pat down to make sure they're packed tightly
Stick labels to a popsicle stick with washi tape or unused plastic knife, talk about up-cycling! 

Hemingway looks on intently

Place saucers under the pots and water until the soil is moist. Ensure that you don't water the plants too much (i.e. when water fills up the saucer) as you can drown the plants and prevent growth. Place near a window and enjoy the process!


Wednesday, January 23, 2013

Creating a Saner To-Do List


Since I became single last June, I decided to have a word of the month that I’d want to focus on and actively embody. One month it was strong (June) another month fearless (July) and another example of a word I had was filter (October). Anyway this month has been all about balance! For me one of the things I wanted to focus on was creating more of a work-life balance, mental balance, health balance (yes it is okay for me to eat 2 chocolate squares instead of one!), etc. Needless to say things are slowly but surely becoming more even keeled in life, even my friends and colleagues complement me on my “balanced lifestyle” so I guess I am doing something right, right?

Well the first thing that I did was look over my daily to-do list and try to create a saner one. Now if you don’t know this about me already, it can be hard for me to let things go but to create a realistic plan I had to honestly ask myself “what can I actually do in a day or rather how little can I do without cheating” as Julie Morgenstern, author of Never Check E-mail in the Morning states.

 So my typical to-do list probably looks like this:


Things I decided to cut or change from my ridiculous to-do list:

-    Cut: My brother is perfectly capable of remembering on his own to take care of this task but if he chooses not to, then I can’t make it my problem. It’s not my job to compensate for other’s deficits.
-       Change: A lot of things that ended up on my to-do lists were driven by worry. Looking for ways to automate tasks that seem to keep popping up will eliminate so much stress for me. In this case, I signed up for automatic bill pay.
-       Cut: Unless it’s going to be something that I need to do at this moment then I can move it to a day when I have more time, such as the weekend.

My final to-do list looks more like this:


-       A more balanced to-do list includes:

   -Connecting with at least one friend. Maintaining relationships are extremely important to me,  have me feeling connected, and energized.
-  -Registering for automatic bill pay is great because my bank e-mail’s me when my payment is about to be sent out so that’ll erase the need for checking and re-checking my budget.
-  -Leaving some time for an unexpected emergency gives me time to cushion or accommodate the unexpected.
-  -Doing something for myself especially something physical everyday helps me stay even keeled. So even if it’s squeezing 30 minutes with my mat and I then it helps me perpetuate my happiness
   -This is super important because putting off something that could cost me money in the long run is no bueno. So taking care of tasks like these are super important! 

Monday, October 15, 2012

The Kitty in the Cupboard and Getting Organized!

Okay so I decided that it was time to get the pots and pans cupboard organized. As you can horrifically see from the photos below (can't lie I'm a little embarrassed) our cupboard was pretty much looking like something straight out of hoarders. So I made a plan to tackle that space this past weekend. 


First I took out ALL of the tupperware, lids, pots, pans, baking sheets, random tools and cleaned the entire inside of the cupboard with soap and water.

Hemingway was so excited to mosey around the newly cleaned out cupboard!

 Then I designated what would go where, all of the baking sheets and utensils on the top left and tools on the top right shelf.


 Also, since the shelves don't go all the way lengthwise (weird I know) I bought these nifty stacking shelves to be able to separate and stack the pots and pans, which made it really easy to separate them by size and not have them all be bunched together. I also purchased this great lid divider to keep all of the pan lids and tupperware lids in one organized location.

Stacker shelf
Lid rack
All in all, I am super happy (yes these things make me happy...my friends don't call me Monica Gheller for no reason). Everything now is easy to see and super accessible. Go me! ;)


 What area of your room or home needs a little TLC? I think my next project is the storage closet...oh dear.